Nowadays, time is the most precious resource that we have, and everyone wants to be as efficient as possible in any aspect of their lives, especially in their business. Efficiency is the name of the game and a WebDAV drive installed on your Mac or Windows10 will help you achieve exactly that. Now let’s see what exactly is a WebDAV drive and what steps do you need to take for installing it on your business computer.
What is WebDAV?
WebDAV is, at its roots, an HTTP extension that has the role of helping you manage data and information on your server remotely. WebDAV comes from Web Distributed Authoring and Versioning and it’s being used for namespace management, and also to manage properties about a modification date or an author. It’s designed as a collaborative platform serving the purpose of helping site owners better manage their files with no extra hassle.
Now we will go over the basics of setting up your WebDAV client on your computer.
Mounting as Local Drive in Windows
Users situation:
I would like to mount a WebDAV server as a local drive or folder, but do not know how to do so.— Old Puppy Forum
To successfully map WebDAV in Windows 10/11 you will need to follow these next steps:
- Open
File Explorer
on your computer by pressingWindows+E
; - Browse through the list, find
This PC
, and right-click on it; - Select
Map network drive
; - Select which hard drive you want to install the WebDAV on;
- Click on
Browse
and pick the folder where you wish to edit or add WebDAV files; - Make sure you tick the
Connect using different credentials
andReconnect at sign-in
boxes; - Click on the
Connect to a website that you can use to store your documents and pictures
; - Click on
Next -> Choose a custom network location -> Next
; - This is the last step, where you just need to type in your credentials and just follow the instructions that appear on your screen. Now you have successfully mapped WebDAV on your computer.
This is the proper way of configuring WebDAV on your Windows 10/11, however, numerous users share the same complaint about getting a „Network discovery is turned off” error on their screen after following the steps. The good news is there are only a few simple steps to follow to solve the error, and they go as follows:
- Open up Settings by pressing the
Windows button + I
(capital i); - Select
Network & Internet
thenNetwork and Sharing Center
; - Click on
Change advanced sharing center
; - Open the drop-down menu from
Guest of Public
after which click onTurn on network discovery
; - Save changes and you’re done. This should fix the error for you.
Mounting as Local Drive in macOS
Mounting WebDAV on your Mac operating system X has a bit fewer steps than for Windows, as Macs are usually more straightforward. There are two ways you can do this, either via menu or via command line, and the steps are as follows:
- Click on Go ->
Connect to server…
; - Enter the WebDAV folder’s URL in the Server Address text box;
- Click
Connect -> Registered User
; - Enter the same username and password that you use for connecting to the cloud;
- Click
Connect
and you’re done. Now you should be able to connect to WebDAV without any further issues.
Mount WebDAV as Local Drive with CloudMounter
CloudMounter service allows its users to connect to a WebDAV server and enables you to have 100% control over any file that is on the server. You can create, upload, edit, browse, and more. Cloud security is a pressing issue for many users and, let’s be honest, nobody wants to see their sensitive information being leaked to the general public. So the best option is to put another layer of protection on your files and make them accessible solely through your CloudMounter copy. Your cloud drivers will be completely protected.
This has so far been the best solution I have ever used to mount my drive that has not let me down, it is simple to use and does exactly what its name implies and mounts my cloud storage in my computer as any other network drive would.— David M. on Capterra
How to Mount WebDAV as a Local Drive on Mac or Windows with CloudMounter
Mounting WebDAV as a local drive with CloudMounter cannot be easier, and the following steps are going to take just a couple of clicks here and there:
1. You need to download the CloudMounter software and launch it on your computer;
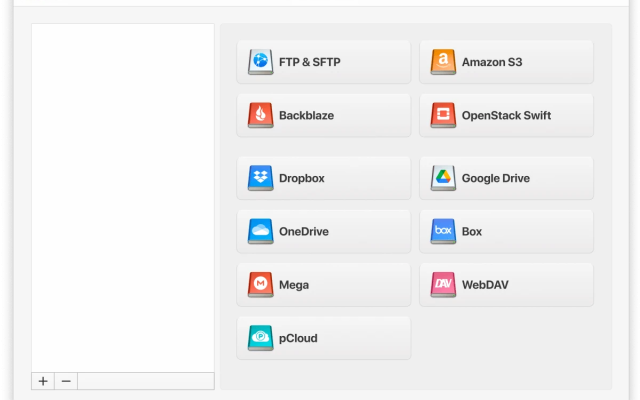
2. From the list of cloud storage platforms select the corresponding icon for which you want to add a new WebDAV connection;
3. In the following window you will have to input the name of your connection, fill in your username and password, and paste the WebDAV URL;
4. Click on Mount and you are connected.
The Verdict
Being able to remotely access and transfer files from wherever you are is a luxury that comes with a price: you have your files and data vulnerable in the face of possible hackers. This is why you absolutely need to add another layer of protection to your data and use WebDAV as a local drive. CloudMounter is extremely easy-to-use and it takes only a couple of clicks to set up on your computer and will help you manage cloud storage without any hassle.
Frequently Asked Questions
If you wish to map a cloud network drive on your Windows 10, simply right-click on My Computer
, select the Map Network Drive
, paste your WebDAV URL in the Folder: entry field, then click Finish. Now just enter your username and password in the authentication textbox and you’re good to go.
To access a shared WebDAV web folder you need a reliable third-party app that enables you to easily connect to the server. Once you mount the webDAV as a local drive on your computer, you can navigate to any folder in a friendly user interface.