Connecting to a File Transfer Protocol (FTP) server is a great way to access files from a remote server on macOS. While you can use the Finder app to manage an FTP server, it’s quite limited in what it can do. A more powerful alternative is CloudMounter, which offers lots of extra features and better file management.
In this guide, we’re going to look at how you can use both methods to connect to FTP server in Mac.
How to use FTP via Finder on macOS
The easiest and most straightforward way to access an FTP server on a Mac is to use the Finder app. Here’s how it works:
1. Open the Finder app.
2. In the menu bar, click on Go > Connect to Server.

3. Enter the server address and then click on Connect.
Keep in mind that Finder is limited to plain FTP and read-only access, so it’s not the most intuitive option if you want more features. You can copy or download files from an FTP server, but to be able to upload, edit, or control files on a remote server, we recommend using a third-party software.
Another problem with using Finder is that every time you reboot or disconnect a disk, you’ll have to go through the steps listed above again to connect to the server.
Is FTP accessible on a Mac through the browser?
No, connecting to an FTP server on a Mac using a browser is no longer possible. Browsers like Chrome, Firefox, Safari, and Opera don’t have FTP access support, so you have no choice but to use a dedicated FTP client for macOS like CloudMounter if you want more control.
How to access the FTP server in Finder via CloudMounter
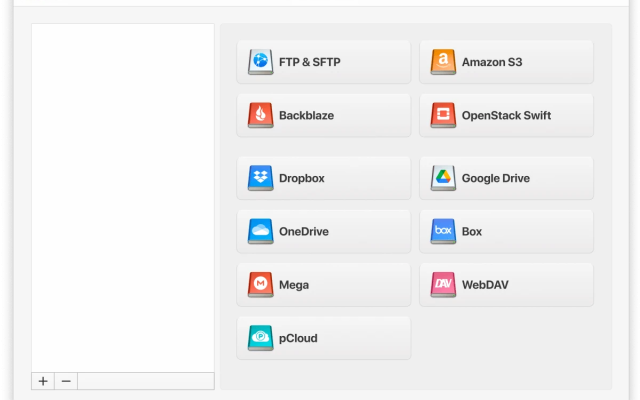
Our app allows you to access your remote server and mount all your cloud storage options as a local drive on Finder. Here’s how to use FTP on Mac using this app:
1. Download and install CloudMounter on your Mac.
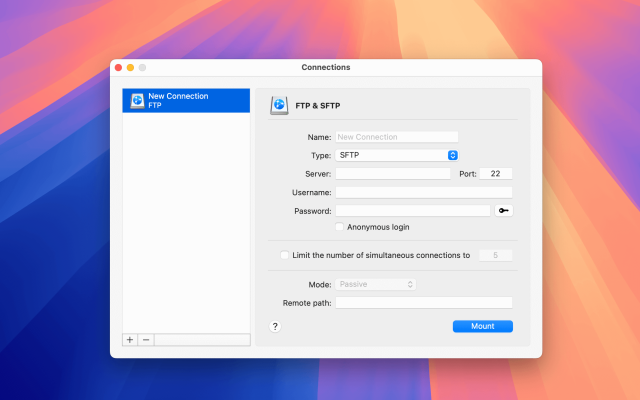
2. Launch the app and click on “FTP & SFTP” storage type.

3. You’ll be asked to fill in the following information:
- Connection type: FTP or FTP with TLS/SSL (for FTPES), or FTP with Implicit SSL (for FTPS).
- Server name, address, and port (usually 21 for FTP and FTPES, and 990 for FTPS).
- Username and password (or anonymous login).
- Active or passive FTP mode.
- Remote path (i.e., the folder on the server you want to connect to).

4. Click on “Mount,” and you should then be able to open your FTP server through the Finder app directly.

Being able to access the FTP server is just the tip of the iceberg. You can also use CloudMounter to name, copy, delete, move, or edit your files, just as they were stored locally on your Mac.
What else is CloudMounter good for?
Here are some other features you get with this app:
- Compatible with both Windows and macOS.
- Allows you to manage all your files in one place with ease.
- Connect to as many accounts as you want.
- Supports a wide range of cloud storage platforms and SFTP or WebDAV remote servers.
- Lets you work with online files without an active Internet connection.
- Client-side encryption provides extra protection for your data.
Conclusion
Finder is great if you just want to access your FTP server and view your files, but for extra features, you’ll have to use a third-party software like CloudMounter. With this app, you can easily mount the FTP server as a local drive. You can also integrate other cloud storage platforms like Dropbox and Google Drive in the Finder app.
Once installed, the app lets you perform a range of actions on files stored on the server, such as renaming, copying, and editing. As you can tell by now, it’s a much better and more intuitive alternative to Finder when working with remote FTP servers.